MISTRAL hosts two dispersors plus two empty slots on a mobile plate. They cover the
full spectral range with a resolution of the order
of 700. The instrument includes four Thorlabs motorized stages used to
move/remove elements from the optical path: the slit, the grisms, the filters
and the calibrating mirror. The FLI filter wheel has 12 positions for 50 mm
filters (available : SDSS g', r', i', z' + Y, galactic H, OIIIa&b, Hα, SII).
Summary of the main filter characteristics
Calibration lights (Hg Ar Xe spectral calibration lamps and Tungsten spectral
flatfield lamp) are inserted within the optical path by four optical fibers via
the calibration mirror which needs to be moved in. In order to facilitate the
operability and stability of the instrument, all the calibration lamps, power
supplies and electronic modules have been integrated directly in the mechanical
structure of the instrument.
MISTRAL can offer two operating modes: regular observing runs in visitor mode and
Target of Opportunity (ToO) in service observing mode for fast transients.
‣ Up
With the advent of new sky surveys, both from the ground and from space, the
exploration of the variable sky is entering a new era. The high cadence of those
surveys, and the large area covered allow a much larger coverage of the physical
parameter space than ever before. As a result, a wealth of new phenomena and
classes of objects are discovered, enlarging the physical diversity, and the
statistics of previously known, but rare phenomena is greatly improved.
On the high-energy side, Gamma-Rays bursts (GRBs) are now observed in large numbers,
and classified into two categories, the short- and long-duration GRBs. On the
Supernovae (SNe) side, it appears that stellar explosions are not just
core-collapse, or thermonuclear explosions of CO white dwarfs, but new
categories are discovered, from ultrabright SNe to faint and fast decaying type
I SNe, and passing through He detonations, Ia objects or luminous red novae. The
range of underlying physical mechanisms must therefore be much more diverse than
previously thought, but is still not understood. On a somewhat quieter side,
Luminous Blue Variables, or numerous peculiar binaries await a better
understanding too.
What is most necessary to progress is enough ground-based
observing time to follow the variations of a series of representative examples
of all those categories, both in photometry, and, even more so, in spectroscopy
and in near infrared (Y band) spectroscopy: only with long time series of
spectroscopic variations, accompanying the light-curves, it is possible
understand the underlying physical mechanisms. Small to medium sized telescopes
are best suited for that, being now more available than before (with 8m
telescopes) provided they are equipped with efficient versatile spectro-imagers.
This is the purpose of the MISTRAL instrument, mounted at the OHP 1.93m telescope.
With a possibility of rapid changeover from the other available
instrument (SOPHIE), it allows fast response to transient objects.
MISTRAL can also follow non transient targets
in the framework of e.g. spatial missions covering fields as galactic HII
regions and their exciting and triggered stars (e.g. Herschel) or nearby
contributions to extragalactic surveys as for example XXL or XCLASS
(XMM-Newton).
‣ Up
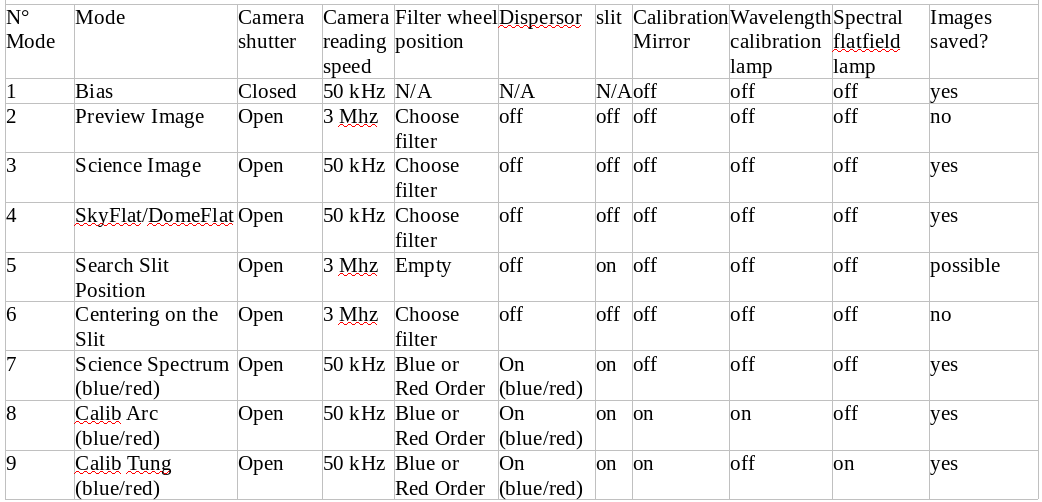
MISTRAL allows several observing modes, accessible from a dedicated
GUI, depending on the position of the different
elements along the optical path. These elements are the filter wheel (12
positions), the spectral dispersors (blue and red VPH, associated with a blue
and red intrance lens), and the slit (1.9 arc-sec wide). These elements are
summarized in Table 1 and organised following the different operating modes. The
Cook Book also gathers
other useful informations about the CCD reading modes, the fringing occuring at
the spectral red-end domain and the CCD optical distorsion in imaging mode.
‣ Up
1) Working environment
The working environment for MISTRAL inside the T193
control room offers a personal visiting astronomer's place, where you can
install your personal laptop and connect it to an additional screen (through a
VGA connection). To the right is a four-screen wall. Two are for the control of
the spectrograph, and the two others are for preparation of the observations
(exposure time calculators, night planner, etc.), data reduction (spectrum
and images quick look tools...), web pages, etc. At the extreme right, you
have a (cable-)phone (04 92 70 64 48).
The two upper screens are controlled by the
MISTRALtube PC. This PC is physically mounted on the T193 telescope and it
directly pilots the instrument itself. It offers a
GUI to launch predefined MISTRAL observing
sequences. There is the Maxim DL windows for
image visualisation after acquisition, along with some pre-processing tools able
to perform basic operations on the images (extraction of the flux along a line,
a box, etc. + basic statistics on the regions).
The two lower screens are dedicated to observation preparation (exposure time
calculators, night planner, etc.), data reduction (spectrum quick-look tool...),
web pages, and all personal observer's tasks. They also offer a
coordinate server: This is the window showing the
telescope coordinates, in principle located in the lower right screen. If not
present, you have to launch the "TelescopeRADEC" icon (in the lower left
screen).
The generated FITS files are first stored within
PC MISTRALtube. They also are duplicated in the other PC MISTRALburo. They are
located by default in the "DATA/date/username". Username is the one requested in
the Command Control MISTRAL window (upper right screen). Date is the current
date. Data are also reachable through the "Access to data" icon on MISTRALburo.
2) Object observability
A planner is e.g.
available from the IRIS telescope, it allows to compute the visibility of any
object from the OHP site. It also allows to predict the distance to the moon and
the moon illumination.
3) Estimated exposure times
— The Cook Book gives informations about
the brightest observable objects still allowing a linear CCD/shutter response.
— A spectral exposure time calculator
(ETC1)
is available to give to the observer a typical exposure time for his/her targets in
spectroscopic mode. It offers the choice of the chosen wavelength range
(blue/red), of the expected seeing, of the target V band magnitude, of the
required S/N for the expected most intense spectral line, of the nature of this
line (absorption or emission), and of the physical shape of the target (point
source or extended source modelled by a Gaussian). In order to give a quick
flavour of the faintest reachable objects you can hope to measure with MISTRAL,
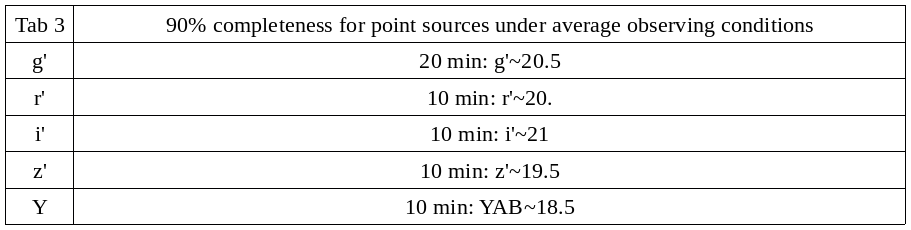
Table 2 summarizes the V band magnitudes corresponding to a total exposure time
of 1 hour, with a minimal S/N of 3, for point sources, and under a seeing of 2.5 arc-sec.

— Two other exposure time calculators
(ETC2,
ETC3) are
available to give to the observer a typical exposure time for his/her targets in
imaging mode.
ETC2 gives you the
exposure time needed to detect objects at a given magnitude with the requested
S/N. ETC3 gives
the exposure time needed to detect objects at a given magnitude with a
probability larger than the requested one. As for the spectroscopic
ETC1, Table 3
gives a quick flavour of the relation between exposure time and reachable
magnitudes, for grizY bands and different seeing conditions.
Other useful information (e.g. the OHP sky light pollution) is available in
the Cook Book.
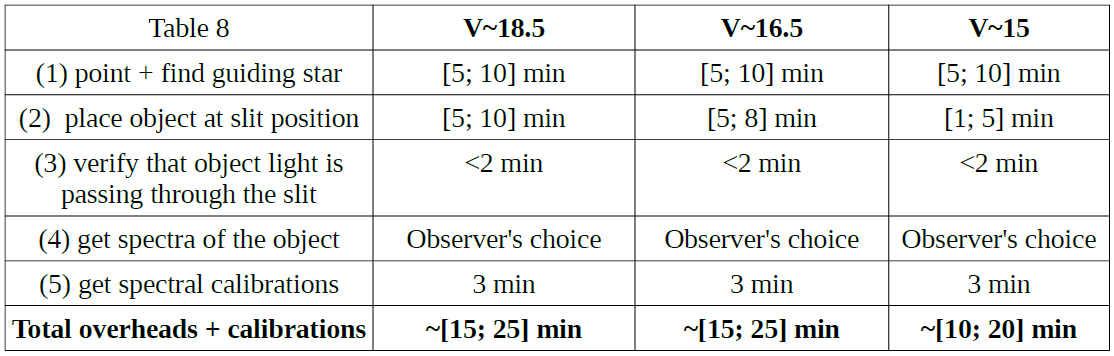
4) Overheads and typical operating times
The maximal durations of different observing steps as recorded during MISTRAL
qualification runs is given here. These maximal durations correspond to objects
very difficult to locate as e.g. transients embedded in large galaxies. Most of
the time, steps are therefore achieved faster than the listed durations. Some
steps also depend on the astronomical object characteristics and Table 4 gives
these durations as a function of several object V-band magnitudes.
5) Guiding
"This guiding offers a ~70arcmin² accessible field of view. This allows the telescope
to automatically guide on V<17 stars. This guiding device being physically attached
to MISTRAL, it is not strongly affected by mechanical flexions. It ensures a punctual
object to stay within the slit for at least 2 hours. Basically all sky positions have
at least a suitable star for guiding, and 85% have at least three
(see Cook Bookfor more details)."
6) Focus
In addition to times in Table 4, observer has also to schedule in his observing
plan at least one telescope focus per night. This is done in general at the
beginning of the night and the required duration for this operation is generally
less than 5 minutes. Other (much shorter) focusses may have to be done during the
night if external conditions are strongly varying.
7) Field rotation
Despite the fact that the MISTRAL instrument or slit can not be rotated by
itself, the T193 telescope adapter allows to rotate the field. This operation can
be useful when several objects are visible in the field in order to fit more
than one target within the MISTRAL slit. This task is not automatized for this
telescope but can be manually done by the night assistant. The typical duration
of such a task is of the order of 5 minutes if you already know the slit P.A.
you want to apply. Note that for a purely north-south orientation of the slit, you have
to set the rotator at between +3 and +4 °.
‣ Up
0) Before the night
It is strongly recommended to estimate imaging and spectral exposure time prior
to the beginning of the night. These can always be adapted during the night
depending on the observing conditions.
— It is crucial to know the magnitude reachable in imaging mode versus the
exposure time. This allows to predict exposure times needed to e.g. detect
transients and to place them through the slit for spectral purposes. The basic
way is to use the previous tables, but it is recommended to use the imaging ETCs
(ETC2,
ETC3) to have an
exposure time more adapted to several parameters as airmass, seeing, sky
transparency, ..etc...
ETC2 predicts an
exposure time for a given magnitude and detection percentage, disregarding the
signal to noise. This case is adapted to be sure to detect a target to place it
within the slit, without beeing intrinsically interested in the object image
itself. ETC3
gives you an exposure time to detect an object at a given magnitude and at a
given signal to noise. This is more adapted to studies requiring to use the
images for themselves, for example if you want to make some basic morphological
studies as star/galaxy separation.
— It is even more crucial to know for how long you need to expose your target in
spectroscopic mode to reach your scientific goals. This exposure time can be
estimated using
ETC1.
It offers the choice of the chosen wavelength range (blue/red), of the expected seeing,
of the target V band magnitude, of the required S/N for the expected most intense
spectral line, of the nature of this line (absorption or emission), and of the
physical shape of the target (point source or extended source modelled by a
Gaussian).
— Let's assume these steps have been satisfied and that you are in the telescope
control room, in front of your screen wall. In principle, you should find the
whole system online when you arrive at telescope. If this is not the case, the
process to follow is described in Section I 9) of the
Cook Book.
1) first step : offsets
These are 0 sec CCD exposures with closed shutter before or after the night. This
can even be done during day time. This is the less penalizing step because
offsets are very stable with MISTRAL (see the Appendix)
and could be approximated by subtracting a constant. We note
that observing Darks is not mandatory (the Dark Current is less than 3
e-/hour/pixel). They do not increase significantly the reduction quality with
MISTRAL.
2) second step : imaging flatfields
This is crucial in order to correct for the CCD response inhomogeneities across
the field of view. This simply consists in observing a uniform light source and
then deducing the CCD response. This uniform light source can traditionally be a
white screen enlighted by some continuous lamp (domeflats), or the sky itself
before the dark night, when stars are still below the sky level (skyflats). The
T193 telescope has no flatfield screen on the dome, so the best way is to use
the sky technique.
- Do not forget to observe skyflats in all the filters you plan to use, as imaging
flatfields can be VERY different from a filter to another one (see the
Appendix).
- Do not observe a single flatfield image per filter as you will have no way to
get rid of statistical variations. Usually, observing five flats per filter is a
good compromise between statistics and time needed to achieve the task.
- Exposure times are very variable and depend on the sky level. However, we do not
recommend to expose for more than 1 minunte because it may cause the first stars to
be detected (or the flat to be saturated)
More details are available in the Cook Book.
3) Getting a usable spectrum
The process of getting usable spectra of a given astronomical object consists in
the following steps. Automated procedures are designed to move the MISTRAL
elements for each of these steps.
— (1) point telescope at the right place: this is done in imaging mode with the
most favourable filter according to the object characteristic. Starting from
theoretical coordinates, the telescope is approximately pointed and a first
image is acquired (mode 3 of Observing Modes: "Preview
image", then "start exposure") and compared to a finding chart. The usual
pointing accuracy of the telescope (but depending on hour angle and
declination) is presently small enough to have your target within the MISTRAL
field of view. The process is iterated until a satisfactory telescope position
is reached. The mode (3) save the images you got. Finally a guiding star has to
be found. This is the task of the night assistant. Given the actual
T193/MISTRAL capacities (sensitivity, FOV), he should be able to find such a
suitable star in 99% of the sky regions.
—
2) Whatever the target, you then have to determine the slit position. For
this, you have to use the "Search Slit Position" mode (mode 5 in the
GUI) within the Command Control MISTRAL window and
press "start exposure". This moves the slit in the optical path. An image (rapid reading mode)
is then automatically taken and shows the sky through the slit. A pop-up window propose an x-position
of the slit (has to be close to 1040, unless smething went wrong). You have to validate it by clicking
on "OK". At this step, you should see the slit on the image (upper left screen).
If slit is not visible or x-position is very different from the 1040 value, you have make the operation
again (should not occur).
— (3) Place target at the slit position. Two
situations are possible: target is a relatively bright object and you can see it
in imaging mode with exposure times typically shorter than ~10 seconds, or,
target is too faint to be detected with exposure times of ~10seconds.
— (4) You can now launch a "Science Spectrum" + "start exp"
(mode 7 of the GUI)
— (5) get spectral calibrations (modes 8 and 9 of the
GUI): these two last steps (wavelength calibrations
and spectral flat fields) involve the injection in the instrument of the light
from Hg Ar Xe spectral calibration lamps and then from Tungsten spectral
flatfield lamp. They can be done after step (4) and are detailed
here.
— (6) Panic mode: not that it will (systematically) happen during a "typical
night", but you may experience troubles with the system. So we summarize
different steps to exit this panic mode.

4) Data Archival
Raw MISTRAL data will be automatically archived (see Cook Book, section V4)
within a database hosted by the CeSAM.
Raw data are visible but not accessible during a proprietary period of 12 months to people
other than PI. All calibration data are immediately public.
A possibility is also offered to the observers to store/make available their
final reduced data and added values through the ASPIC
national service.
‣ Up
A local reduction tool is provided. It is able to give you a real-time basic
spectral reduction (= a 1D spectrum) to judge if your data are good enough for
your science goals, as well as a more complex data reduction
with an optimised cosmic ray removal and a flux calibrated version of the final
1D spectrum. The basic version of the code is very fast to run and is operable
in real time during the observations. The more complex version takes a few minutes
to run. It is usable during the night if you have relatively long exposures, but
was originally designed to be used during day time.
This code is based on the Automated SpectroPhotometric Image
REDuction package (author: Marco Lam) and has been tuned to the MISTRAL needs.
This is a Python code, available at the T193 observing room (and not requiring
any Python knowledge). Iconized in the lower right screen of the mistralburo PC,
it will first ask you the files you want to involve in the data reduction
through a graphical interface, and the places in the raw 2D spectrum where you
want to extract the object and the sky. Then, it will automatically produce a 1D
wavelength calibrated spectrum.
More precisely, it starts from a raw 2D science spectrum (+ a calibration star
for the flux calibration version), and uses
spectral flat fields, wavelength calibration 2D spectra, and offsets
that you provide. These files are listed in a ascii file created by the
graphical interface (which you do not have to edit).
An example of such an ascii file content is
here.
With this input list, the code will automatically:
- provide an automatic detection of the objects in the science spectral image, extract
and draw a non wavelength calibrated 1D spectrum
- make an automatic wavelength calibration along the object path : calibration lamp
automatic line detection and identification
- provide a (non flux-calibrated) final 1D spectrum
taking into account the observatory extinction curve and give a visualisation of
this spectrum available in linear or log scale.
- optimally correct for cosmic rays and provide a flux-calibrated 1D spectrum
for the more complex version of the code.
The whole process is taking a few dozen seconds for the basic version and a few minutes
for the flux-calibration version of the code. It only requests to launch
the "quicklook.py" icon on the reduction PC, selecting the files you want to
examine, and providing the code with approximate initial and final wavelength
(Lambdamin, Lambdamax), the Y line where the object to extract resides (row),
minimal level detection of lines in the wavelength calibration image (level),
and widths of objects and sky extraction (a, b, and c). The style of command the
icon is launching is: python3.6 quicklook.py Lambdamin Lambdamax level row a b c
We give in the Cook Book
the contents of "quicklook.py".
‣ Up
MISTRAL was also built in order to be able to follow target of opportunity (ToO)
procedures.
When you submit a MISTRAL proposal, you therefore have the possibility to
request ToO observations.
1) Alert mode general rules
Not all nights are opened to possible ToOs and a potential ToO observation is subject
to the following rules :
- A shared calendar gives the nights able to host a ToO observation (link will
be given to granted PIs). This calendar is regularly updated to take into account
technical events on the instruments/telescope. It is also taking into account the
fact that, due to internal rules, an alert can not occur more frequently than one
time every 3 nights.
- There are two kinds of possible alerts : day-time trigger by contacting the OHP
director, and night-time trigger for urgent alerts requiring an immediate
(< 1 hour) reaction.
- Night time trigger : the night operator is in charge of deciding to go (or not)
on the target.
Decision tree is as follows :
- night status has to be "open" (see
shared calendar)
- there is a validated ToO proposal, with still available time
- weather is OK
- MISTRAL is working/mounted
- target is observable (coordinates, telescope inclination, etc...)
- The maximal duration of an alert in 2 hours (including overheads)
- If all previous criteria are satisfied, before moving to the ToO target, the
ongoing exposures (MISTRAL or SOPHIE) will have to be achieved, except if the
remaining duration is larger than 30 min.
- In case of technical problems occuring on the MISTRAL instrument, if these are
not solved after 20 min, the alert is cancelled/postponed and the telescope backs
to normal operations.
- At the end of a ToO observation, please download first, then fill and send
ToO Observation Report Form. to
ohp.too.mistral-at-osupytheas.fr .
2) PI/night operator communications
If a ToO procedure is initiated, you will be able to interact with the night operator
using the Slack tool. Interactions will also be possible via emails or phone, but,
except for special cases, we strongly suggest you to use Slack. Connection details
will be given to the PI in case of accepted proposals or validated DDT observations.
When the telescope will be on your target, you will be allowed to proceed as you
want, alternating e.g. imaging and spectroscopy. All observed data will be
automatically downloaded (as soon as observed) to a cloud hosted in Marseille by the
OSU PYTHEAS (connection details will be given if successful proposal). The transfer
time is typically of a few seconds. You then will be able to download your data to
your working place, and to treat them as you want. This will allow you to interact in
nearly real time with the night operator, as if you were at the telescope.
We recall that when you will be close to the maximal duration of your observation
(the time you requested, and 2 hours at maximum: there is a count-down in the
observing room), the night operator will have to close your slot.
‣ Up
